

This post is a departure from my normal posts about topics like balancing hormones or why magnesium is so important, but I thought it was worth sharing as it was one of the most fun family activities we’ve done in a long time.
So You Want to Build A Sandcastle?
Building a sandcastle wasn’t an activity I’d thought much about since childhood, but on a recent vacation to the Florida panhandle I found a Trip Advisor review of sandcastle lessons close to where we were staying. All of the reviews raved about it and I thought it might be a fun activity for the kids.
The morning of our lesson, Rick, the owner of Beach Sand Sculptures (a retired architect and really nice guy) showed up with a team and a whole lot of five gallon buckets. At that point, I realized we’d be building a little bigger sandcastle than I originally expected! The two hour lesson was fascinating (they don’t know I’m posting this, but I’d highly recommend them if you ever vacation in one of the areas where they offer lessons)!
Rick started by talking about the importance of not digging holes in the sand when preparing to build the sand castle, as this could harm sea turtles trying to lay eggs at night, as well as anyone walking along the beach. He explained the difference between the types of sand on the beach and the proper way to build a real, professional style sandcastle.
Turns out, the method I’d learned as a kid of packing wet sand into a mold and flipping it over was not very effective, as there are much more effective ways to build sand structures that are stronger and bigger:
Tools for Sandcastle Building
The first thing that the team explained was the importance of good tools and they brought a variety of items that I’d never thought to use as sandcastle building tools but that are readily available and inexpensive:
- A simple sand shovel (this is the one we had)
- And a bigger plastic or metal shovel (had this too)
- A drinking straw on a lanyard (so they don’t get lost in the sand) – I liked using stainless steel straws since they could also be used for detail
- 1 gallon buckets
- 5 gallon buckets
- A Melon Baller (never thought of using this!)
- An Icing Spatula
- A hack saw blade
- A simple wooden-handled paintbrush
(Note: If you don’t want to buy 1 and 5 gallon buckets, empty 1 and 5 gallon coconut oil containers will work.)
These odd tools will always be part of what we pack for beach vacations from now on, and I was shocked how these simple tools could be used to carve amazing sand sculptures!
How to Build Amazing Sandcastles
I definitely won’t be able to explain this as well as Rick and his team did, but I’m sharing some of the basics we learned:
There are 4 steps that go in order with any sand castle building:
- Sand: Add sand to the form
- Water: Pour enough water to completely cover the sand
- Stir: Use hands or a shovel to stir the sand really well while the water level is above the sand level
- Tap: Use hands to tap the sides of the form to help the sand settle more quickly
We used these steps to build a 4+ foot tall sand castle.
We started by making a big pile of sand. It is important to do this without digging any large holes, so we scooped the top layer of sand off from a large area away from the water, as the sand is finer and better for molding. We traced a large circle in the sand and built up a pile of sand using shovels.
Then, we added lots of water. I wish I’d kept track of how much we used, but it was dozens of buckets and they had us “splash and mash,” by pouring water and packing it down with our feet.
After we had built up the pile and packed it down so it was about 2 feet tall, they showed us a large 5-gallon bucket that had the bottom cut out. This is the form we used to start building the towers. We placed the bottomless bucket upside down on top of the pile of sand we had stacked.
We filled the bucket about 1/3 full with sand and added a lot more water until the water level was above the sand level and we stirred the sand by hand to make sure it was uniformly soaked. Then, we gently tapped the sides of the bucket to help uniformily pack the sand down.

We repeated this process until the entire upside-down form was full of sand. Then, we place a bottomless 1-gallon bucket upside down on top of the 5-gallon bucket mold and repeated the process. We let these drain for a few minutes then carefully removed the forms by lifting up from the bottom and pulling over the top of the tower.
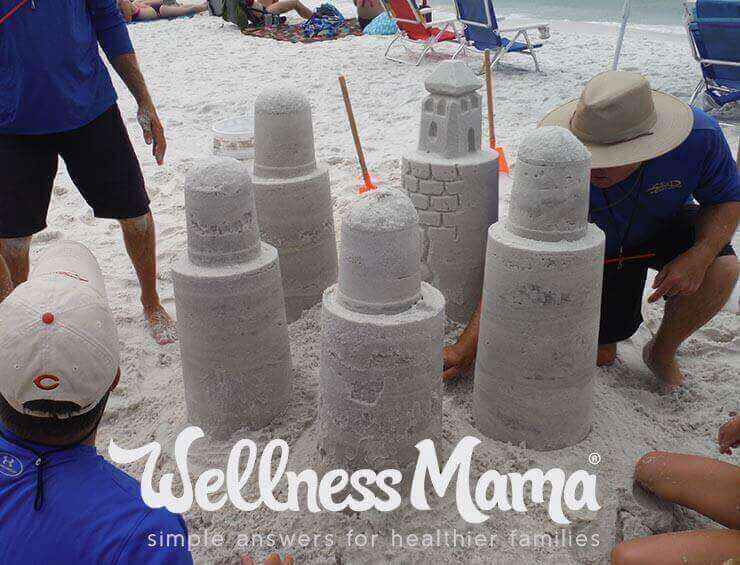
We did this a few more times to make a total of 5 towers and then built walls to connect the towers, shaved out sand to make tunnels, carved steps using the hacksaw blade, and cut detail into the towers with the mellon baller and icing spatula.

We learned many ways to add detail to the sand castle. The shovel, hack saw blade and spatula are used for carving shapes, stairs, and other objects into the castle. The melon baller makes doors and windows and the straws (aka PPD or Personal Pneumatic Device) were used to blow off extra sand and make the finish smooth.
After our lesson, we spent the next few days working on our own sandcastle designs and the kids (and adults) had a blast getting creative!
Ever built a sandcastle? Have any tips?
Continue Reading...How to Build a Sandcastle Like a Pro
from Blog – Wellness Mama® http://wellnessmama.com/121352/how-to-build-a-sandcastle/?utm_source=rss&utm_medium=rss&utm_campaign=how-to-build-a-sandcastle
via SEO Derby
No comments:
Post a Comment